Background
Build on Node.js, Hexo is a much more user-friendly blogging platform compared to Jekyll or Octopress. However, setting up the source/public branch and Github Pages may not be so straight-forward.
Here is my personal guide. I refer the the steps below:
注意
有两种管理 Github Pages 的方法。
一种是 Github 默认的 Pages 功能,我们只需要本地 hexo build 之后 hexo deploy 就好,原理是上传了本地编译好的 /public 文件夹。
For GitHub pages deployment, you have to push the public folder of Hexo to the master branch of “yourname.github.io” repo in your GitHub account.
Make sure the repo name is correct. And “yourname” must match the GitHub account name.
After “hexo deploy”, the changes should be reflected within 5 seconds.
第二种方式是,线上编译(使用 Trvis 免费版)。
前者比较难管理 git remote,所以我决定用后者方式管理发布。
Step 1: setup hexo locally
如果已有 repo
注意一定不要 clone master branch,因为没有任何有效信息。
一定要 clone hexo-source 这个 branch!!!
git clone -b hexo-source git@github.com:unclemartian/unclemartian.github.io.git
cd unclemartian.github.io/
git branch
git clone https://github.com/theme-next/hexo-theme-next themes/next
cd themes/next/
rm -rf .git .gitattributes
rm -rf .github/
cd ../..
git branch
git status
npm i
hexo g
hexo s
为什么要删掉 theme 文件夹 里面的git信息呢?因为 git 使用 submodule 来管理嵌套的 repo,导致 travis 拿不到theme 的源码,之后的自动发布步骤,travis 会报错说 “no layout…”。
所以,一定要把 theme 文件当作源码的一部分,check in 到 hexo 博客代码中去。(当然,我也看过说用 fork/merge 的方法来管理,还可以得到 theme updates。太麻烦了,算了)。
如果是新建 repo
npm install hexo-cli -g
hexo init unclemartian-blog
cd unclemartian-blog/
npm i // npm install
hexo g // generate
hexo s // serve
Next step, make sure public/ is gitignore-ed but the theme/ folder is not:
.DS_Store
Thumbs.db
db.json
*.log
node_modules/
public/
.deploy*/
debug.log
Then on GitHub, create a repo named unclemartian.github.io
git checkout -B hexo-source
git remote add origin git@github.com:unclemartian/unclemartian.github.io.git
git push -u origin hexo-source
Now your Github should have hexo code under hexo-source branch.
以上,Hexo 本地配置完成,我们转战线上发版。
Step 2: setup travis-ci
Travis CI is a continuous integration & continuous delivery platform.
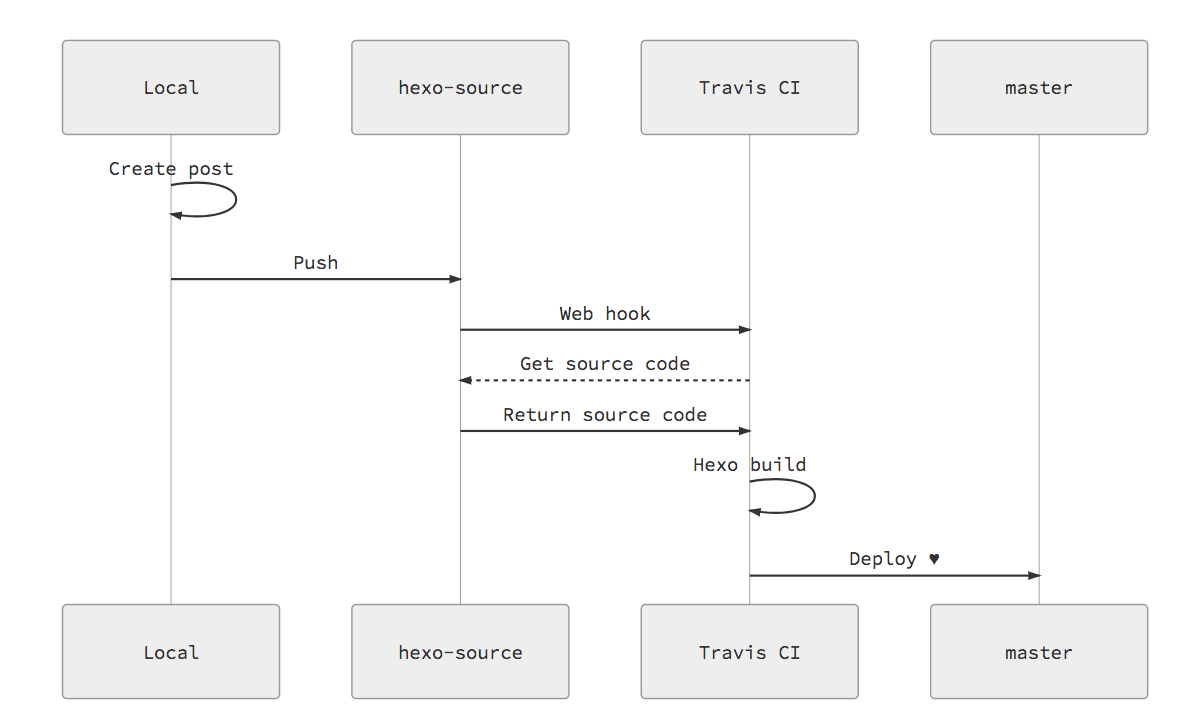
Travis-ci 主要功能,如开篇的图所示:拿到 hexo-source 的代码,运行 hexo generate,然后部署到 github 的 master 分支上,到此为止。余下的工作由 github pages 自动进行。
Basic Setup
Add Travis CI to your account.
https://github.com/marketplace/travis-ciGo to Applications settings, configure Travis CI to have access to the repo.
https://github.com/settings/installationsOn Github, generate a new token with repo scopes. Note down the token value.
https://github.com/settings/tokensOn Travis page, go to your repo’s setting. Under Environment Variables, put GH_TOKEN as name and paste the token onto value. Click Add.
https://travis-ci.com/github/unclemartian/unclemartian.github.io/settings
Publish to master
It is required that GitHub Pages MUST publish the (content of) public folder on master branch.
Create .travis.yml in hexo folder (alongside _config.yml & package.json).
sudo: false
language: node_js
node_js:
  - 14 # use nodejs v10 LTS
cache: npm
branches:
  only:
    - hexo-source # build master branch only
script:
  - hexo generate # generate static files
deploy:
  provider: pages
  skip-cleanup: true
  github-token: $GH_TOKEN
  keep-history: true
  target_branch: master # generate static files to master
  on:
    branch: hexo-source
  local-dir: public
Commit to Github, and Travis CI should start automatically.
Step 3: monitor and release
Useful links
- 查看 hexo-source 源码状态:
https://github.com/unclemartian/unclemartian.github.io/commits/hexo-source - 查看 trvis-ci 状态:
https://app.travis-ci.com/github/unclemartian/unclemartian.github.io/builds - 查看 master branch 部署状态:
https://github.com/unclemartian/unclemartian.github.io/commits/master - 查看 Github Pages 部署的状态 (this step can fail sometimes):
https://github.com/unclemartian/unclemartian.github.io/deployments
Hexo commands abbreviation
#常用
hexo n == hexo new
hexo g == hexo generate
hexo s == hexo server

#不要使用
hexo d == hexo deploy
Hexo day-to-day
以后每天更博之后,只需要运行3行代码,既可自动发版(甚至可以用VSCode自动化):
git add .
git commit -m 'modify hexo get started guide'
git push origin hexo-source
Once it’s complete, checkout the published blog at: https://unclemartian.github.io/